Hear Ye!

Welcome New Sisters! (click for current roster)

Merit Badge Awardees (click for latest awards)

My featured Merit Badge Awardee of the Week is … Kristin Sievert!

Kristin Sievert (KESinMN, #6020) has received a certificate of achievement in Outpost for earning a Beginner Level Glamping Merit Badge!

“We’d been camping a couple times with a new tent. But it really wasn’t something I was enjoying, so I decided I might as well trying to “glamp” it up before heading out for a family resort get-together in July.

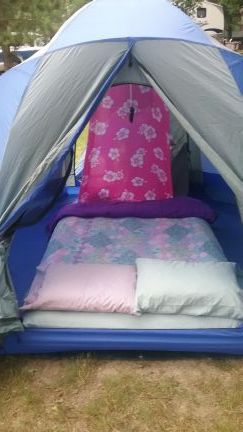
I started with the bed. I thought maybe something visually appealing might help, so I finished up the quilt speedy quick.

I also dug out a king-sized set of sheets (the sheets had pilled) I kept around for a large supply of fabric the same color—just in case. Since the color matched my quilt, I was in luck. I cut the sheets and modified them to fit my queen air mattress. I sewed the flat sheet directly to the bottom edge of the new fitted sheet.

While I was in the sewing room digging around, I came across some pareos that we had purchased as a possible source of fabric for the kids’ travel quilts. The idea was discarded, but not the pareos. I sewed some long lengths of miscellaneous ribbon from the stash across both ends. I used the ribbon to tie the fabric up using the existing “thingies” at the top of the tent to create a “non-load-bearing wall.” It gave me a way to create a second area in the tent.

My “non-load-bearing wall” was to be my bathroom in the tent. I decorated a “luggable loo” in a complementary contact paper and put that behind the fabric wall.

I felt lighting was always kind of a pain in the wahoo. Digging around in the middle of the night for your headlamp was not fun. So I came across this cheap LED light we got from the bank or something. I tied more ribbon on the light, then again used the “thingies” on the tent ceiling.

The quilt was good, but with a silky sleeping bag, it just didn’t work. Will need to try something else.

The modified sheets worked GREAT! They stayed in place on the mattress and the flat sheet sewn on kept it tucked in all weekend.

I am particularly thrilled with my “non-load-bearing wall.” I was able to play quite a bit with its placement in the tent due to the long lengths of ribbon and where the “thingies” were along the tent ceiling. I left it right in place when we rolled up the tent.

A decorated portable biffy wasn’t going to make or break the experience, but it was a girly thing!

The free LED light was rather funky. If it started spinning, it was like a disco ball effect! I was able to adjust the height with ribbon, so we got it just right. Being able to just sit up in bed and find the light was beyond successful.”
kristin-seivert-glamping

  1. Winnie Nielsen says:

    Kristin, your camping solutions are wonderful!! Congratulations on using your Farmgirl Can-D0 ingenuity and finding all sorts of easy and inexpensive solutions to giving your camping experience a make over.

Leave a Comment

Your email address will not be published. Required fields are marked *

photo-of-the-day

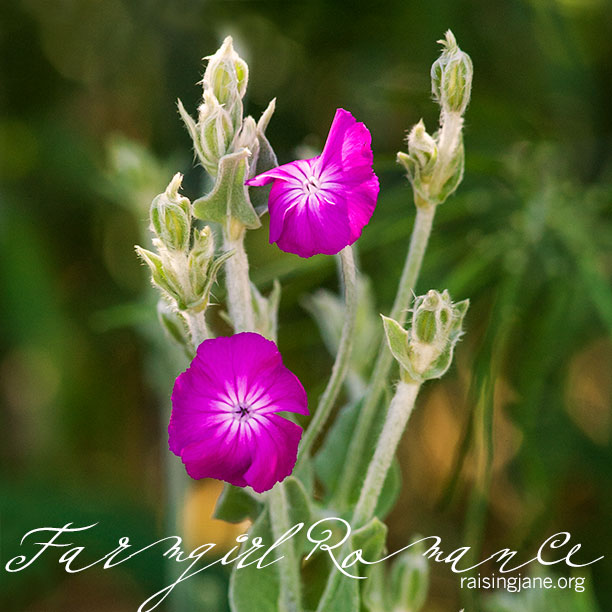
farm-romance_9535

Continue reading

  1. BB king says:

    these look like stachys blooms, yes? ( lambs ears )

Leave a Comment

Your email address will not be published. Required fields are marked *

Hear Ye!

Welcome New Sisters! (click for current roster)

Merit Badge Awardees (click for latest awards)

My featured Merit Badge Awardee of the Week is … Ginger Dawn Harman!

Ginger Dawn Harman (Ginger Dawn, #6451) has received a certificate of achievement in Cleaning Up for earning a Beginner Level My Fair Farmgirl Merit Badge!

“1. Research the difference between cruelty-free and organic health and beauty products versus commercially made.
2. As I run out of each product, I replace it with a healthy, preferably organic version. Examples: toothpaste, shampoo, body lotion.
3. I made lip balm and bath salts.

I found this badge very interesting since I just finished reading about how much work is involved when the U.S. Food & Drug Administration is tasked with regulating cosmetics.

Many can be very sneaky with their labels. For example, “Natural” may be one of the vaguest claims in use today. The FDA states that, “From a food science perspective, it’s difficult to define a food product that is ‘natural’ because the food has probably been processed and is no longer a product of the earth.” So, the FDA doesn’t attempt to define the term “natural” in respect to food or cosmetics at this time.

It’s safe to say that even though people may be led to perceive so-called “natural” products as safer or healthier, that may not be the case. There are plenty of natural things that come from the earth that just are not good for us. Two items that quickly come to mind are lead and asbestos, both of which we wouldn’t want in our cosmetics.

The “organic” claim is currently governed for agricultural products by the U.S. Department of Agriculture (USDA). “The FDA does not define or regulate the term ‘organic,’ as it applies to cosmetics, body care, or personal care products,” according to the USDA Agricultural Marketing service, which oversees the National Organic Program (NOP). The USDA/NOP will, however, allow the use of the “USDA Organic” logo if the product is made up of agricultural ingredients and can meet the organic production, handling, processing, and labeling standards set by the USDA/NOP. All of the entities who supply ingredients, handle, or are part of the manufacturing process of the product must be certified by a USDA-accredited organic certifying agent. Once certified, products are broken down into categories—100% organic, organic, and made with organic ingredients. Products made with less than 95% organic ingredients are not eligible to display the USDA Organic logo on their packaging.

A product labeled as “synthetic-free” contains no man-made ingredients to speak of—it’s 100% made of naturally occurring elements or compounds.

Also I learned about that Leaping Bunny label! That’s a Leaping Bunny certification, which means that none of the product’s ingredients were tested on animals. Another thing to note is that in 2013, Europe banned animal testing on all cosmetics manufactured and sold in the region. Some states in the U.S. have begun to make similar initiatives—but all cosmetic companies that sell in China are required to test on animals, according to the country’s laws, which means that a lot of major brands still test. This makes me rather sad!

I have started using Aveda products and several of my Farmgirl Sisterhood gals in the area swap have sent me handmade soap and have given me instructions on how to make them. I have made the bath salts and lip balm. That was a bit messy, but lots of fun! I love making bath salts and they are such a great gift! Here’s how …

2 cups epsom salts
1/2 cup baking soda
1/4 cup sea salt (optional)
30 drops of lavender essential oils
10 drops of peppermint essential oil

Mix all ingredients in a medium size bowl. Store in an air-tight jar and use 1/4 cup per bath.

I hope that each of my Farmgirl Sisters give this a try!”

Continue reading

Leave a Comment

Your email address will not be published. Required fields are marked *

photo-of-the-day

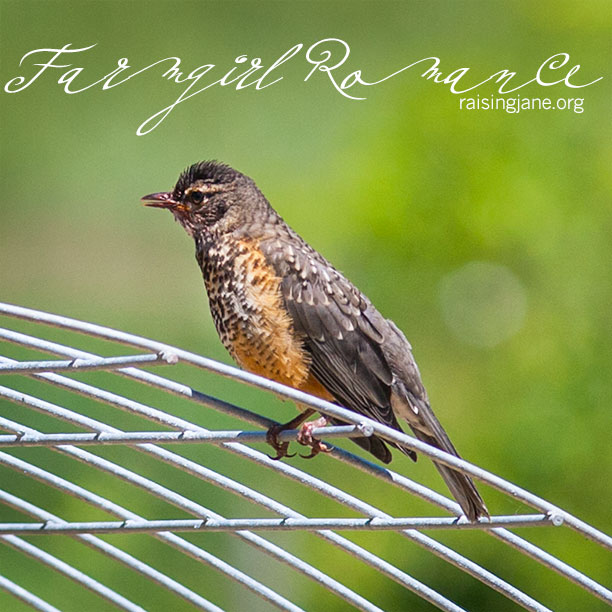
farm-romance_9278

Continue reading

  1. Winnie Nielsen says:

    Baby Robin? The feathers on the top of the head look like a teenager using some gel to get “that look”!

Leave a Comment

Your email address will not be published. Required fields are marked *

Hear Ye!

Welcome New Sisters! (click for current roster)

Merit Badge Awardees (click for latest awards)

My featured Merit Badge Awardee of the Week is … Sherrilyn Askew!

Sherrilyn Askew (Sherri, #1350) has received a certificate of achievement in Stitching & Crafting for earning an Intermediate Level Mosaics Merit Badge!

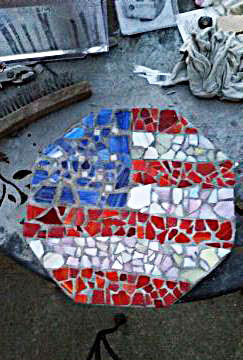
“I made a larger mosaic piece (larger than the last one). I am making a series of stepping stones that are being installed in our hummingbird garden (currently under construction). My daughter is helping me by making a few stones as well. We need them as paths to get to the spigot which is in the garden, and to be able to get at the weeds in the beds. It’s a pretty big garden.

sherrilyn-mosaics_7-10-17

The first one I made, my partner “helped” me with, so I had to take a wire brush to it when it dried to get the concrete off of the tiles. The second one, I lectured him about leaving it alone and letting me do it, so I only had to brush the edges to soften the concrete corners a bit. Since I made it on the 4th of July, that is its theme. My daughter and her friend made stones that day as well. I love the way they all turned out.”

Continue reading

  1. Winnie Nielsen says:

    Sherrilyn, this mosaic turned out beautiful! I love the Americana theme as well for your garden. Please post us a photo when your hummingbird garden is finished. It all sounds quite lovely!

  2. BB king says:

    Very nice flag mosaic!

Leave a Comment

Your email address will not be published. Required fields are marked *

Young Cultivator Merit Badge: All Tied Up, Beginner Level

The adorable, always humorous MBA Jane is my way of honoring our Sisterhood Merit Badge program, now with 7,428 dues-paying members who have earned an amazing number of merit badges so far—10,782 total! Take it away, MBA Jane!!! ~MaryJane 

Wondering who I am? I’m Merit Badge Awardee Jane (MBA Jane for short). In my former life   

For this week’s Stitching and Crafting/All Tied Up Beginner Level Young Cultivator Merit Badge, I had Piper and Nora over for the afternoon. The last time I kid-sat for these two little whippersnappers, we had had an arts and crafts day, and well, let’s just say my living room will never be the same. Not to mention Piper and Nora’s laundry.

Artists are messy. I’m sure Van Gogh’s mother was beside herself on laundry day. Right?

photo by LearningLark via Flickr.com

Anyway, I couldn’t just ban arts and crafts altogether—I mean, that would be cruel and unusual punishment for two little farmgirls who love to create. So, we came up with a fabulous idea: earn a new Merit Badge, and design our own artist’s smocks to cut down on the mess of future art projects.

Note to self: making a mess while creating your answer to making a mess is … a messy paradox. Maybe I should’ve bought smocks for them to make their homemade smocks in. Ah well, live and learn, Janie my girl.

You can use a premade smock and do your decorating from that stage, or if you’re feeling super crafty and DIY-esque, you can make your smock from all sorts of things you likely have lying around the house:

  • Pillowcases are the perfect size for most artistic munchkins. Cut a hole in the top for the head, and two smaller ones at the sides for their arms. Hem the holes, or use bias tape, to avoid fraying.
  • An adult-size T-shirt also makes a great smock for littles. Cut off the sleeves if desired.
  • A terrycloth towel (size depends on size of child; usually a large-ish hand towel is best). Attach a loop of ribbon for placing around head, and tie two more ribbons at the side for tying around waist.
  • If you’re wanting a smock just for a day and don’t mind tossing it in the trash when your epic art afternoon is through, use a paper bag. Follow directions for the pillowcase smock above. These are nice for an entire classroom for a one-day art project.
  • A man’s or woman’s button-down shirt put on backwards makes a great smock.
  • Recycled denim overalls make great smocks. Keep the straps and the front part, and cut off the legs. These are extra nice because they’re sturdy, and they have pockets.

photo by Elaine via Flickr.com

Once you’ve decided what kind of smock you are using, have your wee farmkid decorate. Piper chose puffy paints, and Nora chose her button collection because she had recently learned how to sew on buttons. Other ideas for decorating your new smock:

  • Handprints. We don’t recommend using red paint, though. Kinda looked like a crime scene … ahem.
  • Tie-dye.
  • Fabric markers or paint.
  • Iron-on patches.
  • Simple applique with shapes and embroidery floss.
  • Ruffles and lace for hems.
  • Pockets.
  • Rick-rack.

By the time an hour or two had gone by, we had puffy paint in our ears and buttons between our toes, but we had two gorgeous and one-of-a-kind smocks for our next art project.

Continue reading

  1. Winnie Nielsen says:

    I think kids would love to be involved in making a smock for messy projects. Plus, it would be fun to see what strikes their imaginations when they see fun stuff like buttons, rick rack, and fabric markers. They also might be more willing to wear the smock if it was their own creation. Great work Piper and Nora!!

  2. Krista says:

    When I was a Pre-K teacher I used old adult t-shirts as the children’s smocks. I found that larger men’s shirts worked best because it covered all their clothes. Now I have actually smocks for my boys to use. Looks like we will have to decorate them.

  3. Karlyne says:

    Messy and beautiful!

  4. BB king says:

    this line said it all for me:

    “Handprints. We don’t recommend using red paint, though. Kinda looked like a crime scene … ahem.”

Leave a Comment

Your email address will not be published. Required fields are marked *

Hear Ye!

Welcome New Sisters! (click for current roster)

Merit Badge Awardees (click for latest awards)

My featured Merit Badge Awardee of the Week is … Cyndie Parzuhoski!

Cyndie Parzuhoski (cyndieparz72, #7407) has received a certificate of achievement in Cleaning Up for earning a Beginner Level Shopping Green Merit Badge!

“Per the requirements, I purchased 5 reusable shopping bags. I purchased 5 natural-fiber shopping bags: 4 cotton and 1 jute. I did this because purchasing “#5 reusable shopping bags” defeats the purpose or eliminating plastic, since they are made from polypropylene. Also, 4 of them benefit causes I believe in deeply—animal rights, saving the bees, and the empowerment of women in other countries.

I pledge to use these for every shopping trip from this day forward, and I also have 5 additional reusable bags on order at this time (also from causes close to my heart).

The bags are phenomenal and serve 2 purposes—shopping green and benefiting causes.”

Continue reading

Leave a Comment

Your email address will not be published. Required fields are marked *

Hear Ye!

Welcome New Sisters! (click for current roster)

Merit Badge Awardees (click for latest awards)

My featured Merit Badge Awardee of the Week is … Hadassah Schaap!

Hadassah Schaap (Mentoring Sister Heidi Schaap, #3752) has received a certificate of achievement in Garden Gate for earning a Beginner Level Birds Merit Badge!

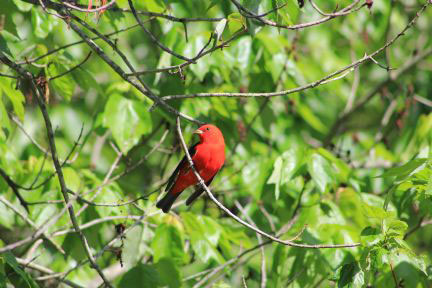
“I researched birds in our area, and located several on our Provident Woods Farm. I made a “future birds to look for” list and found several! I have a book of birds, and a bird journal which I keep bird sightings and nests that I find around our house. We live on a foresty rural farm, so we get a lot of birds around these parts. It’s always so fun to see new baby birds and crazy breeds we have never seen before, such as the Scarlett Tanager or Blue Birds.

Later in the year, I put up a bird house that we had built years before (but never got around to it) and set that out for the Blue Jays, Chickadees, Goldfinches, Robins, and Finches.

I also went on a bird expedition with my camera and got several good pictures, including one of a BRIGHT RED Scarlett Tanager! 🙂

I learned a lot.”

Continue reading

  1. BB king says:

    Wow a scarlet tanager ! We don’t get them around here. Good luck with your birding. Be sure to get some good birding books like the Golden guide ” Birds of North America” the least expensive. I keep all my bird guides and binoculars near the windows where I can grad them as needed.

  2. Winnie Nielsen says:

    Congratulation Hadassah on working on this fantastic badge! Birds are so interesting and it is fun to learn about your local feathered friends like you have done. Here I Florida, we have a pair of Summer Tanagers living close. Y. I was surprised to see and learn that the female is an olive yellow. They both love our suet feeder and often come together.

Leave a Comment

Your email address will not be published. Required fields are marked *